


C to C++: Using Abstract Interfaces to Create Hardware Abstraction Layers (HAL)
A critical practice in embedded software development that most C programmers are familiar with is creating a Hardware Abstraction Layer (HAL). A HAL is used to separate application code from the hardware. Put another way, a HAL decouples the application code from the hardware it runs on, improving portability, reusability, and testing. So far in this series, we’ve looked at tips, tricks, and classes to help you transition from C to C++ in your embedded product development. Today’s post will dive deeper into C++ classes and show you how to use an abstract interface to create a hardware abstraction layer.
Note: If you are interested in catching up on this series, the previous blogs can be found at the links below:
- C to C++: 3 Reasons to Migrate
- C to C++: 3 Proven Techniques for Embedded Systems Transformation
- C to C++: Bridging the Gap from C Structures to Classes
- C to C++: 5 Tips for Refactoring C Code into C++
What is Inheritance?
In C to C++: Bridging the Gap from C Structures to Classes, you saw the differences between how objects are defined and allocated in C and C++. We also introduced you to the concept of structures and classes but didn’t dive into the diverse topics and practices that are associated with them. The first concept that we’ll discuss today that we will want to use to create an abstract interface is inheritance.
Inheritance is a mechanism that allows a new class to be based on an existing class, called the base class. The new class, called a derived class, inherits all the base class members, including its data members and member functions. Let’s look at a visual example to help you fully understand this concept.
Let’s say that you created a base class that contains two features: A and B. You may find that you want to reuse features A and B in another class but add some additional functionality. While you might be tempted to copy the base class, rename it, and add the new feature, this would not be a good idea. The reason is that you now have duplicate code in your system, and if one set changes, you must update the other. Chances are, this will get overlooked, and you could end up with bugs in your code. Instead, you would want to inherit features A and B in another class, giving you the needed features while keeping the code in one place. The inheritance might look something like the image in Figure 1.
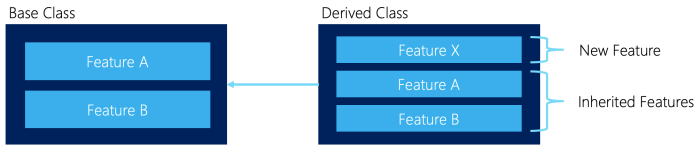
Figure 1 – The derived class inherits features A and B from the base class. The derived class can then add additional functionality.
In Figure 1, you can see that we have our base class that includes Features A and B. The derived class then inherits those features and adds Feature X. Inheritance is a powerful feature that allows code reuse, establishes relationships, and enables extensibility and polymorphism.
Types of Inheritance in C++
There are three types of inheritance in C++.
1.Public Inheritance: In this type of inheritance, the public members of the base class become public members of the derived class, and the protected members of the base class become protected members of the derived class. The private members of the base class are not accessible in the derived class.
2.Protected Inheritance: In this type of inheritance, the public and protected base class members become protected members of the derived class. The private members of the base class are not accessible in the derived class.
3.Private Inheritance: In this type of inheritance, the public and protected members of the base class become private members of the derived class. The private members of the base class are not accessible in the derived class.
For today, looking at each type of inheritance in greater detail is beyond our scope. However, public inheritance is often used when planning to create a hardware abstraction layer, so let’s look at a quick code example.
Public Inheritance in Action
Let’s say we want to create a series of objects that manage LED behavior. We might define a base class that contains the typical functions and data associated with an LED, such as:
- On (method)
- Off (method)
- Toggle (method)
- getState (method)
- state (data)
- port (data)
- pin (data)
In code, the base class might look something like the following:
class Led {
public:
   Led(port_t port, const pin_t pin);
   // Class methods
   void on();
   void off();
   void toggle();
   LedState_t getState() const;
protected:
   LedState_t state;
private:
   const port_t port;  const pin_t pin;};
Notice that we have public class method, private data members, and a protected data member.
If you have a green LED whose brightness you can control, you might decide to inherit from the Led class and add the brightness control. The derived class might look something like the following:
class LedGreen : public Led {
public:
  LedGreen(){state = OFF;};
  ~LedGreen() = default;
  void setBrightness(const std::uint32_t brightness){
                    this->brightness = brightness;  };
private:
  std::uint32_t brightness;};
There are a few important notes to make here. First, we are publicly inheriting from the Led class. A LedGreen object will have access to the Led public methods and members, protected access to the protected members, and no access to the private members. That means we would see the following behaviors from the application code:
// Valid public Led calls
ledGreen.toggle();
ledGreen.getState();
// Valid LedGreen calls
ledGreen.setBrightness(100);
// Invalid calls
ledGreen.state = LED::OFF;
ledGreen.port = PORTB;
Note: LedGreen is not fully specified because we aren’t showing how you would assign a pin, etc. But you can get an idea of how public inheritance works.
Virtual Functions in C++
A virtual function is a member function that can be overridden in a derived class. It is declared with the virtual keyword in the base class, and any derived class can provide its implementation function. For example, let’s say you have a simple Led class defined as follows:
class Led {
public:
  virtual void toggle() {PORTB ^= 0x10;}
};
The above code defines a Led class with a toggle method that will toggle a bit on PORTB. However, let’s say we have a LedGreen task that wants to inherit the toggle method from Led, but the toggle pin is different. In this case, since the Led toggle method is virtual, LedGreen can define its toggle function and override the one provided by Led as follows:
class LedGreen : public Led {
public:
  void toggle() override {
    HAL_GpioTogglePin(PORTA, PIN_14);
  }
};
Virtual functions enable polymorphism, which is the ability of objects of different types to be treated as the same type. By defining a virtual function in the base class, derived classes can provide their implementation of the function, allowing objects of different derived types to be used interchangeably.
Abstract Classes in C++
An abstract class is a class that has at least one pure virtual function. A pure virtual function is a virtual function that is declared in the base class but has no implementation. An abstract class cannot be instantiated directly but can be used as a base class for a derived class. The syntax for declaring a virtual function would look something like the following for the Led class:
class Led {
public:
  virtual void on() = 0;
  virtual void off() = 0;
  virtual void toggle() = 0;
};
You might then implement a LedGreen class that uses the abstract base class as follows:
class LedGreen : public Led {
private:
  bool state; // True if ON, False if OFF
public:
  LedGreen() : state(false) {}  // Initially OFF
  void on() override {
    if (!state) {
      // Code to turn the green LED ON (can be specific to hardware or platform)
      std::cout << "Green LED is ON" << std::endl;
      state = true;
    }
  }
  void off() override {
    if (state) {
      // Code to turn the green LED OFF (can be specific to hardware or platform)
      std::cout << "Green LED is OFF" << std::endl;
      state = false;
    }
  }
  void toggle() override {
    if (state) {
      off();
    } else {
      on();
    }
  }
};
Each led class type that inherits from Led will be forced to provide the implementation for the Led methods.
Click above to learn about Jacob's Migrating to C++: Classes and Object-Oriented Design course. Use the code ERCPP23 to save $50.
Using Abstract Interfaces to Create Hardware Abstraction Layers (HAL)
If you’ve been reading carefully, you may have realized that our Led base class acts like a hardware abstraction layer. We have the functions associated with Leds and the interface defined, but we don’t have the implementation details. We can write code that operates on objects of type Led, which any derived class would be, without caring about those low-level details! In modern embedded software development, that’s exactly what we want. I could have code that blinks an LED on a development board or code that simulates that blinking on a GUI app running on my development machine!
If we were to take our Led class and officially make it a hardware abstraction layer, an interface, there are a few adjustments we would want to make.
1.In C++, interfaces are typically denoted by putting an i at the front of the class name. So Led would become iLed. Alternatively, we could name it something like LED_INTERFACE or HAL_LED. How you do it is up to you.
2.We would want to add an enum to define OFF and ON values, giving us an LedState_t.
3.We should define constructors and destructors for the interface.
4.(Optional) delete the copy constructor, assignment operator, move constructor, and assignment operator as it makes sense. (Something we haven’t discussed yet but will likely cover in the future).
If we were to make these changes, you’d find that we now have an abstract interface that looks something like the following:
class ILed {
public:
  enum {
    OFF = 0,
    ON = 1
  } LedState_t;
  // Constructors and Destructors
           ILed() = default;
  virtual ~ILed() = default;
  // Class methods
  virtual void on() = 0;
  virtual void off() = 0;
  virtual void toggle() = 0;
  LedState_t getState() const;
protected:
  LedState_t state;
private:
// Delete the copy constructor and assignment operator.
// This prevents the compiler from generating them.
// We don't want to allow copying of Led objects.
  ILed(const ILed &other) = delete;
  ILed& operator=(const ILed&) = delete;
// Delete the move constructor and assignment operator.
// This prevents the compiler from generating them.
// We don't want to allow moving of Led objects.
  ILed(Led &&other) = delete;
  ILed &operator=(ILed &&other) = delete;
};
Note: We can use some other techniques to clean up the private section, but I don’t want to overburden the reader with too much new at this point.
Conclusions
Abstract interfaces are a fantastic tool for creating a hardware abstraction layer. In fact, you can use them to create HALs and any abstraction for higher-level application code like API’s. Abstract interfaces help you break the dependency between higher-level application code and lower-level infrastructure code that touches the hardware. In the next post, we’ll take these interfaces to the next step by introducing you to templates and how to combine templates and abstract interfaces to create generic hardware abstraction layers that will work on any microcontroller.


- Comments
- Write a Comment Select to add a comment
Hello!
Using "enum" is unsafe, it is better to use "enum class" for the LedState_t type
Inheritance of virtual functions has a large overhead for simple classes like pins, leds, relays, etc. Here it is better to build HAL either on templates or on some wrappers over the vendor’s library
Great blog, and indeed this is the way it should be done.
Just one comment - the field
protected:
  LedState_t state;
has no place in the interface class - it exposes an implementation detail, and one could argue it makes the class no longer abstract.

Thanks! Gotta love copy/paste modify! This is why I'm such a big fan of code reviews though.
Thanks for the comment and catch!
Hi, I was about to mention the use of the CRTP C++ pattern for implementing static interfaces; however, in the conclusions section it's mentioned the use of templates, and maybe that's the next post about it, so I'll wait.
Meanwhile, interfaces and polymorphism can be taken to the next level: interchangeable components: you code and test your embedded code in the PC (using both the native GDB and TDD) as components until the hardware arrives; and once it's ready then you write the components for such hardware. Basically you're decoupling the logic from the hardware. I've written something about it in case I've grabbed your attention:
http://fjrg76.com/2022/04/28/software-components-f...
I'm using such schema in an ongoing project because my customer hasn't decided yet about the final hardware. It'll use custom LCD, that isn't ready, so I've written a LCD interface/component, binded to a 16x2LCD, so I can code the project's logic, it's awesome!
Actually I've designed all hardware devices as components, from the humble GPIO to the fancy LCD, so the design is ready for the future.
If you want to dive a little bit into the CRTP pattern you can start HERE, which is a post in my alternative blog. There, in the Bibliography section, you'll find links to other (better written) articles about this pattern.
Thanks for sharing! I think these will be useful for readers to go a bit further.
In this series we will eventually get to these types of techniques, we're just working our way to them!
Thanks again!
To post reply to a comment, click on the 'reply' button attached to each comment. To post a new comment (not a reply to a comment) check out the 'Write a Comment' tab at the top of the comments.
Please login (on the right) if you already have an account on this platform.
Otherwise, please use this form to register (free) an join one of the largest online community for Electrical/Embedded/DSP/FPGA/ML engineers: